
Grab-Bar Backing Before Tile in a Fort Myers Bathroom
Once tile covers your bathroom walls, adding dependable grab-bar support becomes harder and more disruptive. Installing grab bar backing while the framing is exposed gives your contractor access to build a secure connection before finishes hide the work.
For a Fort Myers renovation, that means planning bar locations alongside plumbing, framing, and waterproofing. Start with how you'll use the bathroom, then confirm the backing and installation details before anyone closes the walls.
Why grab bar backing needs a framing connection
A grab bar needs a dependable attachment that transfers force into the wall structure. Tile, grout, and wallboard aren't substitutes for that connection.
Solid backing gives the installer a planned fastening surface where the bar's mounting points will land. However, the backing itself must also connect securely to the framing. A loose piece of lumber inside a wall doesn't provide a reliable installation.
Adding support during demolition and rough-in also preserves future options. You can prepare selected walls now, even if you won't install bars immediately.
Include this work in the written remodeling scope. Identify who plans the locations, installs the backing, records its position, and completes the final bar attachment.
Choose grab-bar locations around everyday use
Plan for entering, standing, and transferring
Review where you need support while entering the shower, stepping over a tub edge, standing, or using the toilet. These movements can require different bar positions.
Walk through the proposed layout with your remodeling contractor before finalizing the wall plan. Include the shower door, controls, toilet location, and any planned seat.
If a household member has mobility limitations, an occupational therapist can help identify useful support locations. Don't assume a convenient-looking wall position matches that person's reach or transfer needs.
The broader layout also matters. Blue Heron's primary bathroom remodel planning guidance covers coordinating fixture locations and wall changes before construction.
Match backing to the actual mounting points
Select the grab-bar model early when possible. Its mounting arrangement determines where the installer needs support behind the finished wall.
Mark each mounting area on the wall drawings. A bar can cross a supported section while one of its mounting ends lands outside it. Planning must account for the full attachment pattern.
For future bars, discuss broader backing coverage rather than guessing a single position. The contractor should choose the material and coverage for the intended installation.
Measure locations using the planned finished surfaces as reference points. Floor finishes and wall assemblies can change the relationship between rough framing and the final mounting position.
Coordinate backing with plumbing and framing
Resolve conflicts while the wall is open
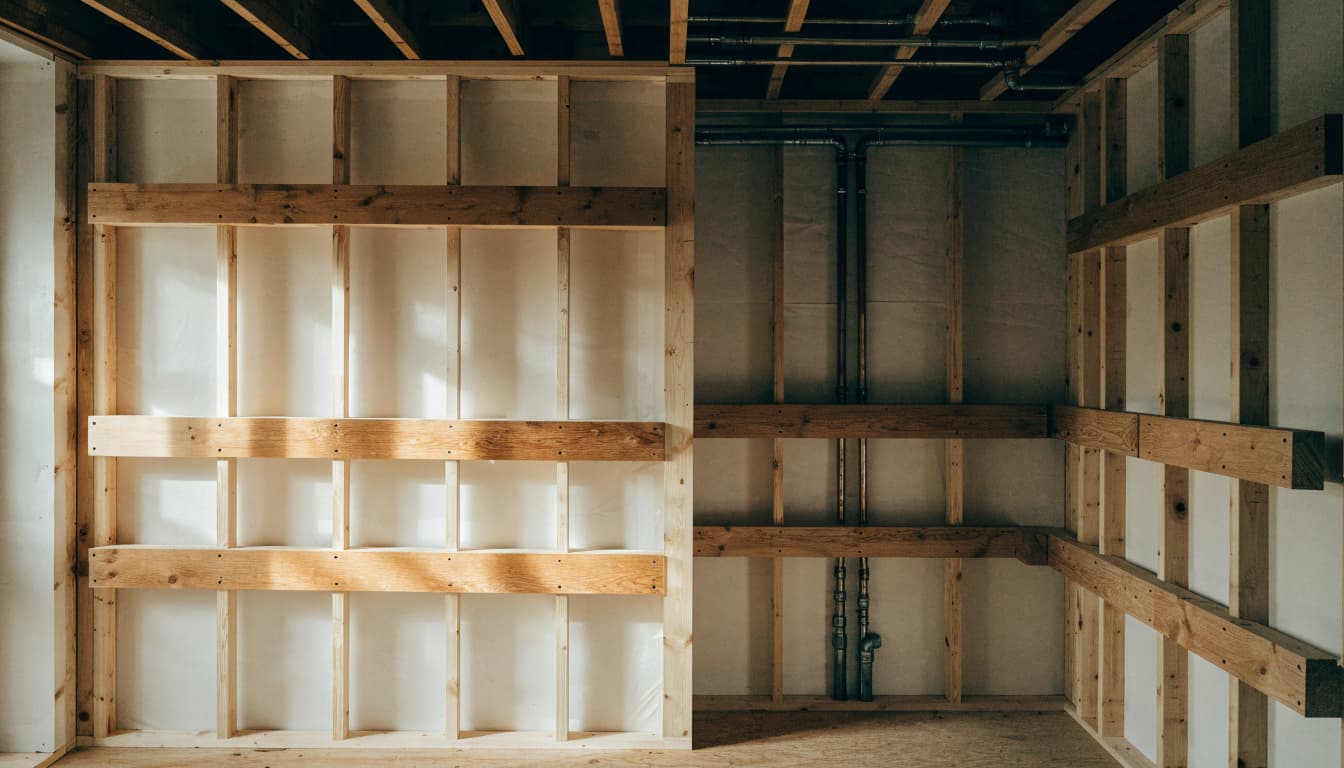
Shower valves, supply piping, drains, wiring, and niches may occupy the same wall areas intended for backing. Review these conflicts before the carpenter starts installing support.
The plumber and contractor should agree on a layout that leaves room for both the backing and the eventual fasteners. Avoid planning attachment points directly over concealed utilities.
Also coordinate access to serviceable plumbing components. Backing shouldn't prevent necessary maintenance or interfere with the selected fixture's installation.
If a conflict requires moving plumbing or changing the bathroom layout, update the drawings and scope. Don't leave that decision for the tile installer.
Check the existing wall construction
An exposed bathroom wall may reveal damaged framing, previous alterations, or a different construction type than expected. Address those conditions before adding backing.
For wood-framed walls, the contractor needs sound framing that can accept the planned connection. Metal-stud or masonry walls require details suited to those assemblies.
Don't improvise by cutting studs or heavily altering existing framing to make blocking fit. Ask whether the proposed changes need design or engineering review.
This coordination is especially useful during a tub-to-shower renovation. Blue Heron's shower conversion planning guide covers the layout and construction decisions that should precede wall finishes.
Install solid backing before closing the walls
The backing material and attachment details should follow the selected grab-bar instructions, wall construction, and any project-specific design requirements. Your contractor should resolve those details before installation.
For a wood-framed wall, the work generally follows this sequence:
- Confirm the mounting zones against the final bathroom layout and the selected bar's attachment pattern.
- Fit solid backing between or across the framing, as required by the approved wall detail, without interfering with utilities.
- Secure the backing to the framing using connections appropriate for the intended installation.
- Check its position, document the work, and complete any required inspection before covering it.
The backing must support the bar's attachment points without disrupting the wallboard installation. Poorly positioned material can create an uneven substrate or force the finish installer to work around a framing problem.
Avoid treating a strip of material fastened only to wallboard as equivalent to structural backing. The support needs a dependable connection to the framing.
Likewise, don't assume any screw left over from another task is suitable. The contractor should choose the backing connections and final mounting hardware according to the applicable instructions and design.
Before closure, have the installer confirm that the planned mounting points reach the installed support. This review catches mismatches while they remain easy to correct.
Keep waterproofing continuous around the installation
Coordinate the backing with the wall assembly
Backing belongs behind the finished wall assembly. It doesn't replace the tile substrate or the shower's waterproofing system.
Confirm how the wallboard, membrane, tile, and grab-bar attachment will work together. The backing detail must allow the waterproofing installer to complete the selected system without gaps or improvised transitions.
Also review nearby niches, benches, and wall intersections. These details can compete for space and require their own waterproofing treatment.
Blue Heron's curbless shower planning guidance recommends installing solid backing before wall finishes and planning waterproofing around penetrations.
Plan the final penetrations before tile begins
A surface-mounted grab bar usually requires attachment through the finished wall. Plan those penetrations according to both the waterproofing system and the bar manufacturer's instructions.
The contractor should identify the applicable sealing detail before tile installation. Don't assume the decorative flange or surrounding grout provides the required waterproof protection.
Photographs can identify concealed backing, but they don't establish how a later penetration should be waterproofed.
Keep the waterproofing product information with the project records. A future installer will need to know the wall assembly, not merely where the wood sits.
Confirm Fort Myers permit and inspection requirements
A Fort Myers mailing address doesn't necessarily place your home within the City of Fort Myers permitting jurisdiction. Confirm which authority handles your property before scheduling work.
Permit requirements depend on the renovation scope. Plumbing relocation, electrical changes, ventilation work, and structural alterations can affect the approval path.
Don't assume installing backing always requires a separate permit. Also, don't assume it exempts the surrounding remodeling work from review. Ask the applicable building department or your contractor how the complete project should proceed.
Blue Heron's Fort Myers bathroom permit checklist explains jurisdiction checks and preparing documents that reflect the actual work.
If inspections are required before wall closure, protect that stage in the schedule. On properties with prior flood damage or qualifying flood-zone work, ask whether additional floodplain review applies.
Finally, distinguish personal accessibility preferences from requirements that legally apply to the project. Don't adopt a universal placement rule without confirming its relevance.
Document the backing and hand off the installation plan
Before the walls close, photograph each supported area with clear reference points. Record the backing boundaries and nearby utilities on a wall sketch.
Use references that will remain identifiable after construction, such as a finished corner or doorway. Also note how the planned floor and wall finishes affect the measurements.
Keep the photos, drawings, grab-bar instructions, and waterproofing information together. If bars will be installed later, give the homeowner copies rather than leaving them only in a subcontractor's records.
For bars installed during the remodel, have the final installer compare those records with the actual mounting layout. The fasteners must connect to the intended structural support, following the selected product's instructions.
After installation, the contractor should check the completed attachment and waterproofing details. A bar that feels firm by hand still needs the correct underlying installation.
Resolve any uncertainty before the bathroom returns to use.
Key takeaways
The most useful preparation happens while the walls are open:
- Choose mounting locations around the user's needs and the actual grab-bar model.
- Attach solid backing securely to suitable framing, with plumbing and other utilities kept clear.
- Preserve waterproofing, document concealed support, and confirm project-specific permit requirements before closure.
Preparing support now can make a later installation easier. However, future installers still need the product instructions and wall records.
Frequently asked questions
Can backing be installed without adding grab bars now?
Yes. You can include backing during a bathroom remodel and install bars later.
Agree on the intended support zones before wall closure, then document their exact boundaries. Keep the records with the home's remodeling documents.
When you're ready to add a bar, confirm that its mounting pattern fits the installed backing. A prepared wall still requires careful attachment and waterproofing at the final installation stage.
Does every grab bar need the same backing detail?
No single detail fits every wall assembly or product. Wood framing, metal studs, and masonry require different attachment approaches.
The selected bar's instructions and any project-specific design should guide the installation. Don't transfer a detail from another bathroom without checking that it suits this wall.
If the existing construction can't accommodate the planned support, have the contractor resolve the connection before tiling rather than improvising afterward.
Build dependable support before the finishes hide it
A finished bathroom can conceal either carefully planned support or a missed opportunity. Secure framing connections , coordinated plumbing, and a compatible waterproofing detail make the difference.
Before tile begins, confirm the mounting zones and preserve the backing records. That preparation gives the final installer a clear path to a properly supported grab bar, whether it's added during this remodel or later.