
Where Should Kitchen Backsplash Tile End at Open Edges?
At an open edge, kitchen backsplash tile usually looks best when it ends along a clear line, such as the side of a cabinet, the end of a countertop, or the trim around a window. The right stopping point depends on your layout and which surfaces need protection.
There isn't one placement that suits every kitchen. A planned edge can make an uneven layout feel intentional and keep exposed tile looking finished.
Start by looking at the lines around your counter and cabinets.
Where Should Backsplash Tile Edges Stop?
The most useful stopping point is often the one that looks natural from across the room and protects the working area. When cabinet and countertop edges line up, the decision is straightforward. When they don't, choose one clear vertical line rather than changing direction partway up the wall.
Aligning With Upper Cabinets
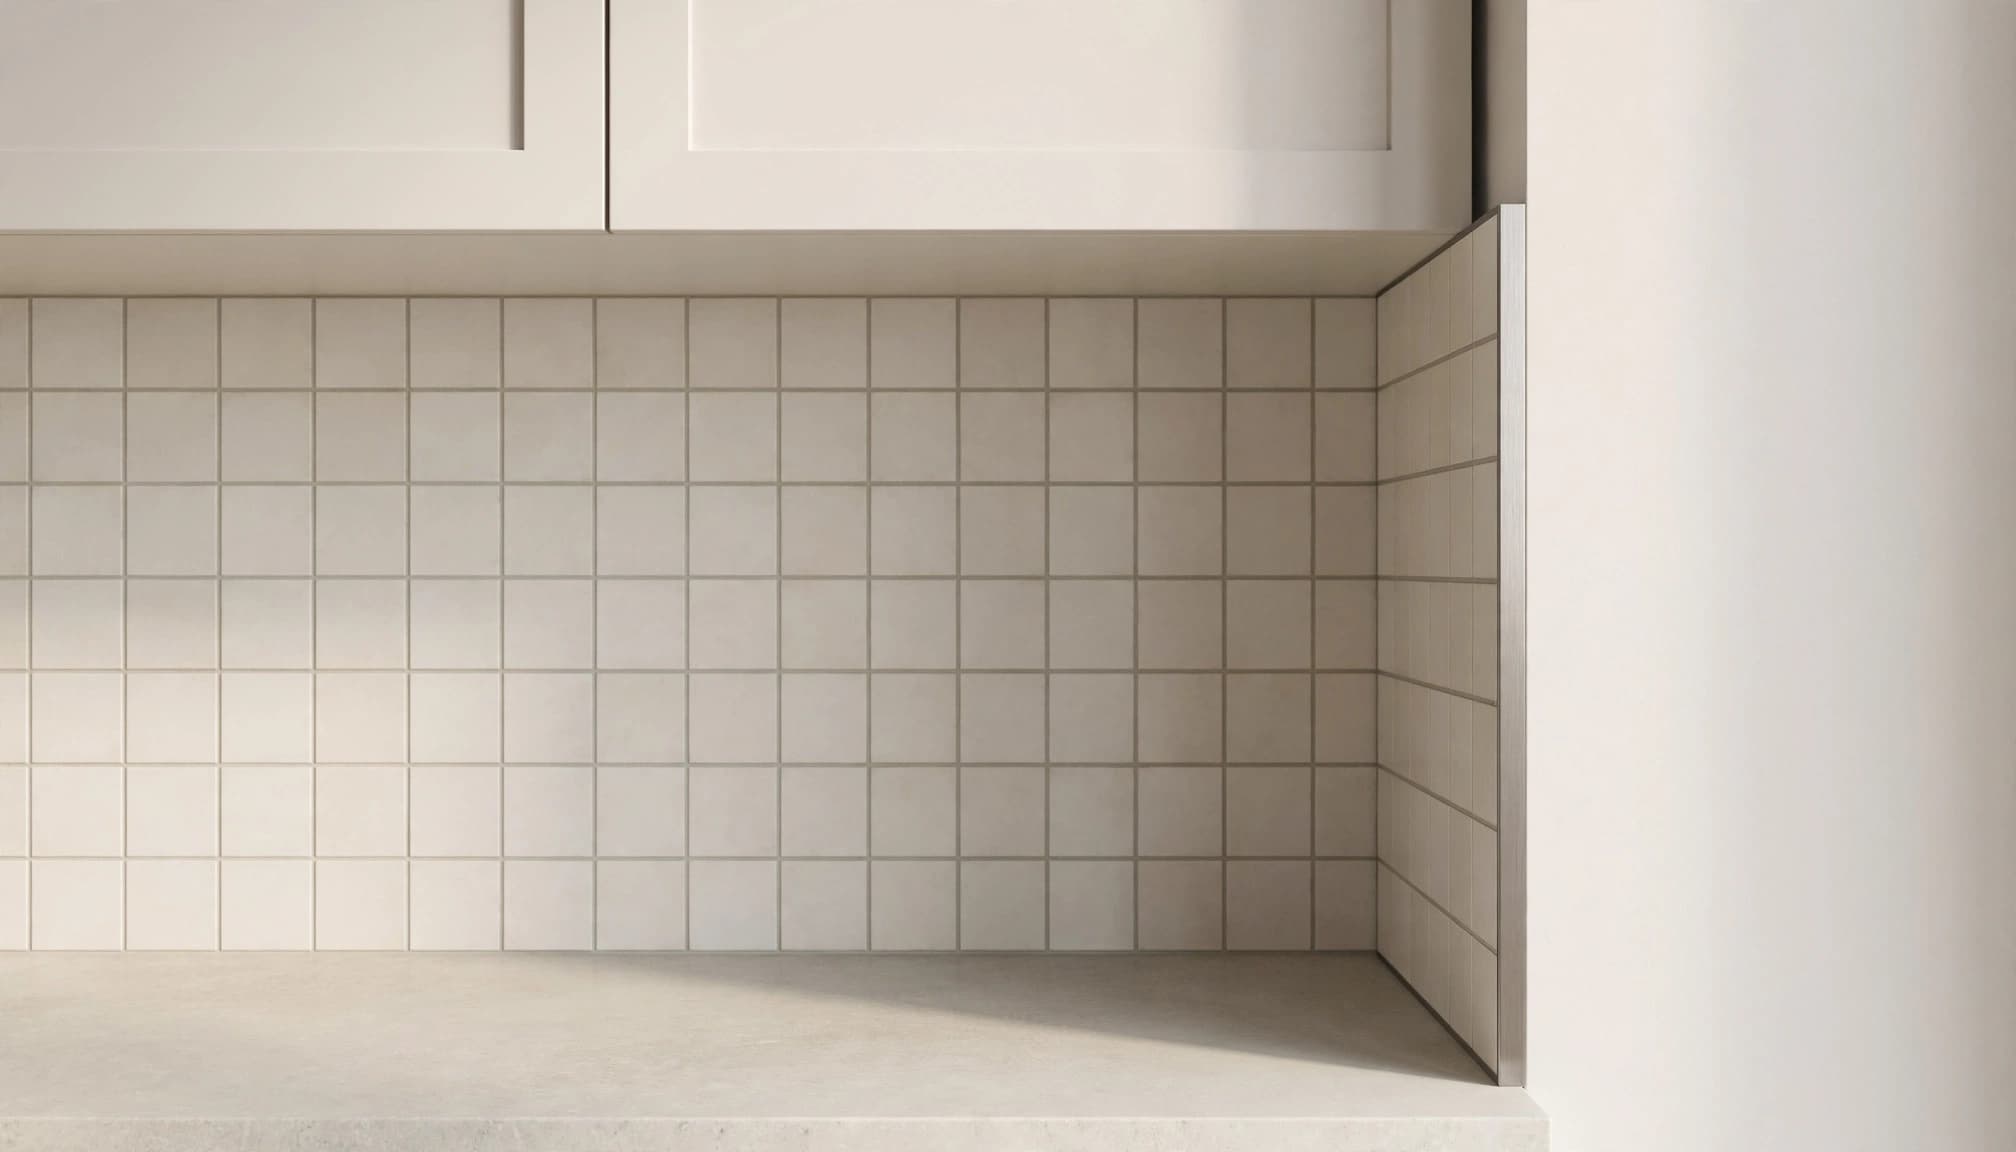
Ending tile flush with the side of an upper cabinet creates a tidy frame for the space beneath it. This approach works especially well when the cabinet edge is prominent and the counter ends nearby.
If the countertop extends past the cabinet, look at how that extra counter space is used. A prep area near a sink may benefit from tile continuing to the counter's end. A short overhang used mainly for display may look balanced with the tile aligned to the cabinet.
Aligning With the Countertop
Ending the backsplash at the countertop's outer edge visually connects the two surfaces. It also covers the wall behind the full work surface, which can be useful near a sink or food preparation area.
When the upper cabinet stops short of the counter, the tile will extend beyond it. That can look deliberate if the exposed edge is straight and neatly finished. The same approach can work when there are no upper cabinets at all.
Choosing a Stopping Point Near Openings and Corners
Windows, doorways, and open-plan layouts introduce their own lines. Look at the entire wall before deciding where each run of tile will end.
Windows and Doorways
A window casing can provide a natural boundary for backsplash tile. You can also continue tile beneath a window and around its sides if that fits the height and design of the wall.
Near a doorway, ending at the casing often creates a cleaner transition than leaving a narrow strip of painted wall between the tile and trim. If there's more space between the counter and doorway, however, an edge aligned with the counter may look better. Leave room for an appropriate flexible joint where tile meets the casing.
Outside Corners and Open Walls
An outside corner is a clear place to end a backsplash when the adjacent wall belongs to another area. Finish the exposed tile edge so its body and cut surface don't distract from the room.
If the counter continues around the corner, carrying the tile onto the adjoining wall can give the work area a more complete appearance. On an open wall with no nearby corner, a straight vertical edge aligned with a cabinet or counter is often the simplest choice.
Four Ways to Finish an Exposed Tile Edge
Once you've chosen a stopping point, select the edge treatment before ordering tile. The finish affects the appearance of the border and the materials needed for installation.
Tile Trim
Metal or other tile-edge trim creates a narrow border along the exposed side. Profiles come in a range of finishes, including options that coordinate with cabinet hardware or blend into the tile.
Choose a profile suited to the tile's thickness and intended installation. Trim is installed as the tile goes up, so it's part of the layout rather than an afterthought.
Bullnose Tile
Bullnose has a rounded, finished edge that creates a softer transition to the wall. It can be a good match for ceramic or porcelain tile when the collection includes coordinating trim pieces.
Bullnose isn't available for every tile. Look at the color and finish of the matching piece alongside the field tile, since the border will remain visible.
A Finished Tile Edge
Some tiles have an attractive factory-finished edge that can remain exposed. Others reveal an unfinished body or a cut edge that contrasts with the surface.
Certain materials can also be finished or polished at the edge, depending on the tile. This option can give a backsplash a minimal look without a separate border, but the tile itself needs to suit that treatment.
Tile Returned Around a Corner
A return continues the tile onto the adjoining wall instead of stopping at the outside corner. It can make sense when a countertop wraps around the corner or when both walls are part of the same work area.
The return still needs a finished edge where it ends. Its width should look intentional alongside the counter, cabinets, and surrounding wall.
Plan the Layout Before Installation
Mark the proposed stopping point on the wall and look at it from the main entry to the kitchen. Consider how the border meets the countertop, upper cabinet, and any nearby trim. A narrow sliver of tile at the edge can draw attention, so the installer may adjust the tile layout to produce a better-looking cut.
Also consider outlets before the wall is tiled. Our guide to kitchen outlet locations and backsplash design covers how electrical placement fits into the wider cabinet plan.
At the countertop, use a suitable flexible sealant rather than rigid grout in the joint. Grout fills the spaces between tiles, while the flexible joint accommodates movement where surfaces meet. Material and maintenance choices matter too, especially around sinks in humid kitchens.
Give Your Backsplash a Deliberate Finish
A clean backsplash edge starts with a stopping point that suits the room. Cabinet sides, countertop ends, openings, and corners can all provide useful boundaries.
Choose the edge treatment early, then consider it alongside the tile layout and surrounding finishes. For a larger renovation, our kitchen remodeling services in Cape Coral can help bring those decisions together.